Category Archives: eclipse

STS (Spring Tool Suite) Lombok Configuration


In your STS based application, you can follow the below STS Lombok Configuration to support you IDE for Project Lombok annotations.

Prerequisites

These are the pre-requisite of Project Lombok to configure in any applications and IDE.
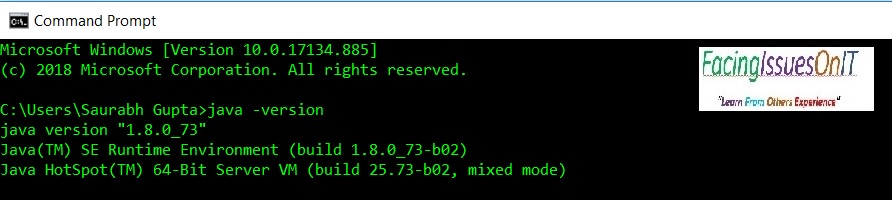
Java >= 1.8
Gradle >= 4.x or Maven 3.6.x
Project Lombok >= 1.18.20

Ways to configure Lombok in STS

In this post, you will know about the three ways on configuring the Lombok in you STS IDE.

  • Manually configure the STS
  • STS Plugin for Lombok
  • STS Software Center

Manually Configure STS for Lombok

  • Download the lombok.jar from https://projectlombok.org/download
  • Place this lombok.jar in you root folder of STS installation location
  • Double click on the jar, it will open open popup as below. Select the IDE location by click “Specify location”
  • Click on “install/update” button.
STS Lombok Configuration
STS Lombok Configuration 1
  • Click on “Install/Update” button. On successful installation you will get below screen
  • Click on “Quit Installer”
  • Restart you STS IDE to refresh the Lombok features in case already open.
STS Lombok Configuration
STS Lombok Configuration 2

Lombok STS Configuration by Plug-in

You can install lombok directly from within STS, and in that way, you can also include lombok as part of your team STS deployment configuration.

Follow below steps to configure the Lombok STS configuration by plug-in

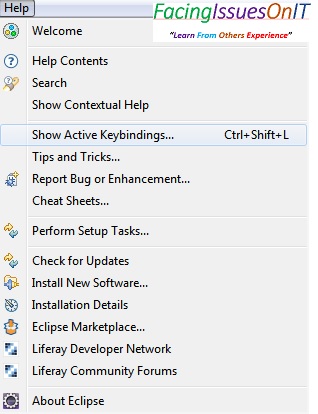
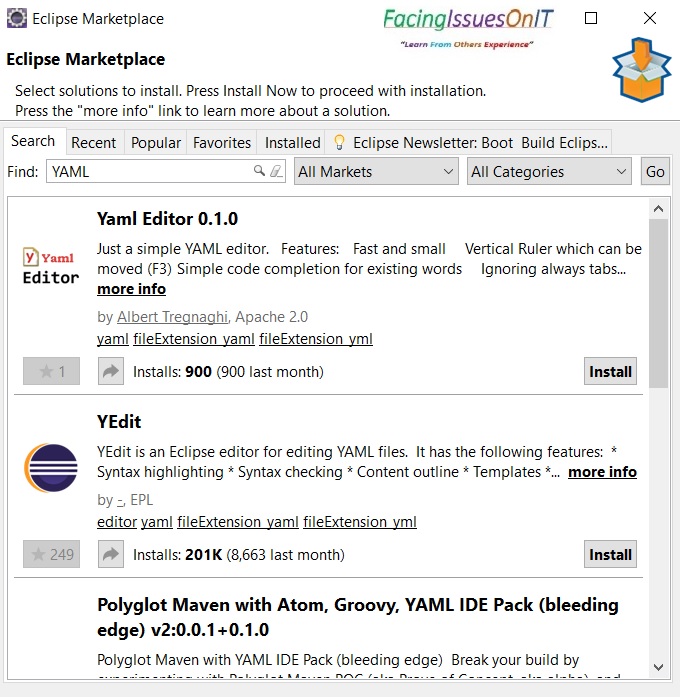
  • Go to your STS “Help->Search->Install New Software” as given
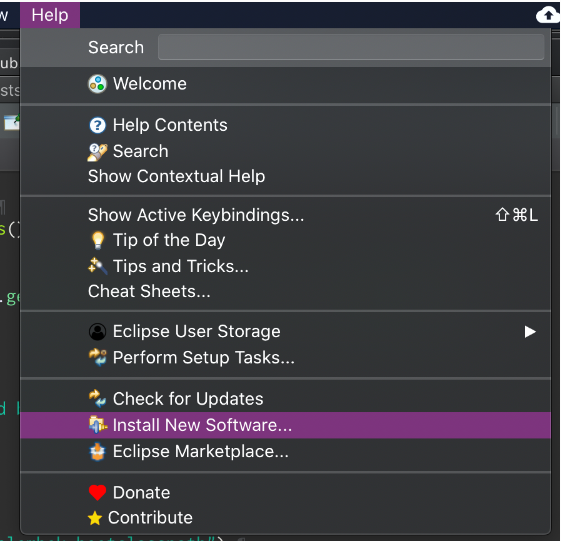
STS Lombok Configuration by plug-in
  • Select the Lombok Plug-in check boxes and click on install button
  • After Installation successful, Restart your STS IDE to refresh lombok features.

STS Lombok from Software Center

Some of the latest version of STS IDE already supports Lombok Project. In this case you don’t required any of above steps:

To check Lombok Support in STS IDE you can follow these steps:

  • Go to the about dialogue
  • Supported version on Lombok detail will display at last in “Copy Write” section as given in screenshot.
STS Lombok Configuration

References

Conclusion

In this post you have learned about the multiple ways of Lombok Project configuration in you STS IDE.

Advertisements
Advertisements

Your Feedback Motivate Us

If our FacingIssuesOnIT Experts solutions guide you to resolve your issues and improve your knowledge. Please share your comments, like and subscribe to get notifications for our posts.

Happy Learning !!!

Gradle: Plugin Configuration in Eclipse or STS


Gradle Configuration in Eclipse or STS (Spring Tool Suite)

  • Step 1: Open Eclipse or STS IDE
  • Step 2: Go to Help -> Install from Market Place.
  • Step 3: Search for Gradle
  • Step 4: Select the option “Buildship Gradle Integration “.
  • Step 5: Click on the Installation button as in the below screen.
    Gradle Plugin Configugration in Eclipse or STS

  • Step 6: Navigate to the next screen. Select “I accept terms and license agreements
  • Step 7: Click on the Finish button.
  • Step 8: Click on Confirm and then your IDE will get started.
  • Step 9: Go to File -> Projects -> Search for Gradle.
  • Step 10: You will see the below screen.
Gradle Project in Eclipse

Here you have learned about the configuration of the Gradle plugin in Eclipse and STS (Spring Tool Suite).

See Also:

If this blog helps you or any issue facing related to Gradle drop comments to us.

Advertisements
Advertisements

Your Feedback Motivate Us

If our FacingIssuesOnIT Experts solutions guide you to resolve your issues and improve your knowledge. Please share your comments, like and subscribe to get notifications for our posts.

Happy Learning !!!

[Solved] Maven Error on Eclipse/STS : Could not calculate build plan org.apache.maven.plugins:maven-jar-plugin:jar:2.4


This maven error generally happen when create maven based web project by using “maven-archtype-console” which generally try to import all library automatically.

You will see this complete error message on pom.xml


Could not calculate build plan: Plugin org.apache.maven.plugins:maven-jar-plugin:2.4 or one of its dependencies could not be resolved: Failed to read artifact descriptor for org.apache.maven.plugins:maven-jar-plugin:jar:2.4

maven error

POM.XML


  4.0.0
  com.FacingIssuesOnIT
  Spring-Core-Examples
  0.0.1-SNAPSHOT
  Spring-Core-Examples
  Spring Core Exammples

Solution 1:

You need just to follow those steps:
Right Click on your project: Run (As) -> Maven clean
Right Click on your project: Run (As) -> Maven install
After which, if the build fails when you do Maven Install, it means there is no web.xml file under WEB-INF or some problem associated with it.

Solution 2:

Right click on project-> Maven->Click checked box ‘Force Update’->Update

[Solved] Maven Error on Eclipse/STS : Failure to transfer org.apache.maven.plugins:maven-surefire-plugin:pom:2.12.4


This maven error generally happen when create maven based web project by using “maven-archtype-webapp” which generally try to import all library automatically.

You will see this complete error message on pom.xml


Description Resource Path Location Type Failure to transfer org.apache.maven.plugins:maven-surefire-plugin:pom:2.12.4 from http://repo.maven.apache.org/maven2 was cached in the local repository, resolution will not be reattempted until the update interval of central has elapsed or updates are forced. Original error: Could not transfer artifact org.apache.maven.plugins:maven-surefire-plugin:pom:2.12.4 from/to central (http://repo.maven.apache.org/maven2): The operation was cancelled. pom.xml /SpringCoreTuto line 1 Maven Configuration Problem

POM.XML


<project xmlns="http://maven.apache.org/POM/4.0.0" xmlns:xsi="http://www.w3.org/2001/XMLSchema-instance"
  xsi:schemaLocation="http://maven.apache.org/POM/4.0.0 http://maven.apache.org/maven-v4_0_0.xsd">
  <modelVersion>4.0.0</modelVersion>
  <groupId>com.fiot.example</groupId>
  <artifactId>SpringCoreTuto</artifactId>
  <packaging>war</packaging>
  <version>0.0.1-SNAPSHOT</version>
  <name>SpringTuto Maven Webapp</name>
  <url>http://maven.apache.org</url>
  <dependencies>
    <dependency>
      <groupId>junit</groupId>
      <artifactId>junit</artifactId>
      <version>3.8.1</version>
      <scope>test</scope>
    </dependency>
  </dependencies>
  <build>
    <finalName>SpringCoreTuto</finalName>
  </build>
</project>

Solution 1:

You need just to follow those steps:
Step 1: Right Click on your project: Run (As) -> Maven clean
Step 2: Right Click on your project: Run (As) -> Maven install
After which, if the build fails when you do Maven Install, it means there is no web.xml file under WEB-INF or some problem associated with it.

Solution 2:

Right click on project-> Maven->Click checked box ‘Force Update’->Update

Setup Java/JDK and Eclipse On Window & Linux


Before creating the Java project, the first thing is to check to JDK installed or not in your machine.

How to check Java version in your machine?

Window

  • Go to search
  • Type cmd and enter or search for Command prompt
  • You will see a black screen for the command prompt as below.
  • Type java -version to get detail about it.

Linux

  • On the current screen type command as java -version to get detail about it.
Java Version Check.jpg

The above screen is for the case when java is installed on your screen. If JDK/JRE is not installed on your machine then you will get a message like “Java is not recognized as an internal-external command.”

How to setup Java from Initial?

If JDK/JRE is not set up in your machine then follow below steps:

Download JDK from this siteDownload JDK Latest Version

Windows

  • After downloading click on the .exe file to install
  • Follow all steps as the next button and continue as long as a process not complete.
  • Default download location for Java will be  “C:\Program Files\Java\jdkVerXYZ”
Java JDK Directory

To access Java from command prompts or IDE need to configure environment variables as JAVA_HOME and Path. The value of JAVA_HOME would be home directory path where JDK installed and Path would be (JAVA_HOME/bin)

Follow these steps to configure the environment variables

  • Go to Computer ->right click-> Properties -> Advance System Settings->System Variable
  • or Go to search type ENV and click on enter.
  • Enter that value of JAVA_HOME as below
Java_Home
Set JAVA_HOME
  • Set the Path by appending at last as below %JAVA_HOME%/bin;
Java Path Settings
  • Follow the above steps to check Java versions.

Linux 

  • Download JDK and untar it.
  • Go to your home directory/ sudo directory and set JAVA_HOME and Path in .bashrc file as below:

export JAVA_HOME=/opt/app/<installation directory>/jdk1.8.0_66

          export Path=%JAVA_HOME%/bin:$Path

  •   Save .bashrc file
  •  Now run java -version  to check configuration is successful.

Configure Eclipse IDE

Download Eclipse: Download Eclipse Latest Version

  • Click on the installable of Eclipse IDE.
  • Continue the installation by next click.
  • Select the path of JDK as installed.
  • Select the workspace location for your projects.

Now you are ready to create new projects in Eclipse IDE.

See Also :

Advertisements
Advertisements

Your Feedback Motivate Us

If our FacingIssuesOnIT Experts solutions guide you to resolve your issues and improve your knowledge. Please share your comments, like and subscribe to get notifications for our posts.

Happy Learning !!!

Java: How to generate Java doc by command line and Eclipse IDE?


In the previous post, you learn about the type of comments supported by Java. Now in this post will explain the ways to generate Java documentation of project by both ways:

  1. Java Doc by Eclipse
  2. Java Doc from Commandline

Now we will continue with the same previous comments file example to generate java documents by both ways:

Java Comments Type

Java Doc generation from Eclipse

Follow the below steps to generate Java API documentation:

  • Go to Project tab
  • Select the option “Generate Javadoc”
  • Follow steps in the screen as below:
  • Click on Next button
  • Click on Next button again
  • Finally, click on Finish button
java Doc generation in eclipse 1.jpg

In your console logs will see a link like as below to java doc of file.

D:\Saurabh Gupta\Workspace-learning\JavaExamples\doc\com\common\statements\CalculatorTest.html

Open this file you will see java doc comments on class and method level of this file as highlighted:

Java doc generation eclipse 2

Java Doc generation from Command-line

To generate Java doc from command-line you can use the below command.  It will generate Java doc file in your user directory (default) on below location:

C:/Users/username/CalculatorTest.html


javadoc you_java_file_path

You can use javadoc command as below.

Java doc generation from commnad line

Here are some of the scenarios to generate java doc:

Java doc on a specific location from the package

You can use below command to generate Javadoc for all files with the package from the projects folder:

Syntax:


C:\myprojects> javadoc -d [path to javadoc destination directory] [package name]

Example:


C:\myprojects> javadoc -d C:\javadoc\test com.fiot.test

Java doc generation execution from some other location

You can use the below command when you need to generate java docs and want to run the script from a different location.

Syntax:


C:\> javadoc -d [path to javadoc destination directory] -sourcepath [path to package directory] [package name]

Example:


C:\> javadoc -d C:\javadoc\test -sourcepath C:\myprojects com.fiot.test

Java doc generation for selected files

You can use the below command when you need to generate Javadoc for specific files then you can mentioned files path separated by spaces (or use an asterisk(*) for a wild card).

Syntax:


C:\> javadoc -d [path to javadoc destination directory] [source filenames]

Example:


C:\> javadoc -d C:\javadoc\test C:\projects\com\test\file1.java

If you need to generate Javadoc from the same folder use wildcard(*) and mentioned in the given example.

Example:


E:\MyJavaFileFolder> javadoc *.java

References

https://docs.oracle.com/javase/8/docs/technotes/tools/windows/javadoc.html

Advertisements
Advertisements

Your Feedback Motivate Us

If our FacingIssuesOnIT Experts solutions guide you to resolve your issues and improve your knowledge. Please share your comments, like and subscribe to get notifications for our posts.

Happy Learning !!!

Eclipse : [Top 50] Keybord Shortcuts


Why eclipse shortcuts?

To make developer more productive eclipse provides keyboard shortcuts to perform faster for more common actions.

“The less you touch the mouse, the more code you can write”

Eclipse also supports most common shortcuts used with all common editors like , Ctrl+C for copy, Ctrl+S for saving, Ctrl+V for paste etc.

How to get complete list of eclipse shortcuts?

You can get complete list of eclipse shortcuts after following below steps:

  1. Open Eclipse IDE
  2. Got to help. (Screen 1)
  3. Click on “Show active key bindings” or “Key Assist” depend on IDE. (Screen 2)
  4. On eclipse bottom right corner you will see complete list of eclipse shortcuts.

or

For getting these shortcuts also have one shortcut as Ctrl + Shift + L. (Screen 2)

Screen 1

Eclipse keyboard Short Cuts -1

Screen 2

Eclipse keyboard Short cuts

From above screen you can gets list of all eclipse shortcuts but here we will focus on most common used by developers in day to day development activity.

What are most commonly used shortcuts by developers to make more productive?

Here is list of most frequently used shortcuts by developers and corresponding description.

  • Ctrl+Shift+R  : Search dialog for resources,  java files,  xml files and properties etc. based on name and matches. as in screen below.

eclipse short key cntr short R

same way you can also try others as below.

  • Ctrl+Shift+T : Search dialog for finding files from jar.
  • Ctrl+F8 : Shortcut for switching perspectives
  • Ctrl + Sift +F : for auto formatting
  • Ctrl + Shift + P : find closing braces
  • Ctrl+O : Shows quick outline for going to class method.
  • Ctrl + /  : for commenting, uncommenting lines and blocks

Shortcuts to navigation between editors

  • Ctrl+E : Search dialog to select an editor from the currently open editors
  • Alt+← :Go to previous opened editor. Cursor is placed where it was before you opened the next editor
  • Alt+→ : Similar Alt + ← but opens the next editor
  • Ctrl+Q : Go to editor and the position in this editor where the last edit was done
  • Ctrl+PageUp : Switch to previous opened editor
  • Ctrl+PageDown : Switch to next opened editor

Shortcuts to navigation between views

  • Ctrl + F7 : Shortcut for switching views. Choose the view to switch to with your mouse or cycle through the entries with repeating the keystroke
  • Shift+Alt+Q : Open menu for switch view keybindings
  • Shift+Alt+Q+P, Shift +Alt +W : Show package explorer
  • Shift+Alt+Q+C : Show console

Shortcuts to start Java programs

  • Ctrl+F11 : Run last launched
  • F11 : Run last launched in debug mode
  • Ctrl+Alt+B : Skip all breakpoints. Let’s you use debug mode for code reloading
  • Alt+Shift+X, J : Run current selected class as Java application
  • Alt+Shift+X, T : Run JUnit test
  • Alt+Shift+X, P : Run JUnit Plug-in test

Shortcuts to editing in the Java editor

  • Shift+Alt+↑ : Selects enclosing elements.,result depending on cursor position
  • Ctrl+1 : Quickfix; result depending on cursor position
  • Ctrl+Space : Content assist/ code completion
  • Ctrl+T : Show the inheritance tree of the current Java class or method.
  • Ctrl+O : Show all methods of the current class, press Ctrl + O again to show the inherited methods.
  • Ctrl+M : Maximize active editor or view
  • Ctrl+Shift+F : Format source code
  • Ctrl+I : Correct indentation, e.g., format tabs/whitespaces in code
  • Ctrl+F : Opens the find dialog
  • Shift+Enter :  Adds a link break at the end of the line
  • Ctrl+Shift+O : Organize the imports; adds missing import statements and removes unused ones
  • Alt+Shift+Z : Wrap the select block of code into a block, e.g. try/catch.
  • Ctrl + /  : for commenting, uncommenting lines and blocks
  • Ctrl + Shift + /  : for commenting, uncommenting lines with block comment
  • Selecting class and pressing F4 to see its Type hierarchy
  • Ctrl + F4 , Ctrl + w : for closing current file
  • Ctrl+Shift+W :  for closing all files.
  • Ctrl + l :  go to line
  • Select text and press Ctrl + Shift + F for formatting.
  • Ctrl + F :  for find, find/replace
  • Ctrl + D :  to delete a line
  • Ctrl + Q :  for going to last edited place

Shortcuts to cursor navigation and text selection

  • Ctrl+← or Ctrl+→ : Move one text element in the editor to the left or right
  • Ctrl+↑ or Ctrl+↓ : Scroll up / down a line in the editor
  • Ctrl+Shift+P : Go to the matching bracket
  • Shift+Cursor movement : Select text from the starting position of the cursor
  • Alt+Shift ↑ / ↓ : Select the previous / next syntactical element
  • Alt+Shift ↑ / ↓ / ← / → : Extending / reducing the selection of the previous / next syntactical element

Shortcuts to copy and move lines

  • Ctrl+Alt+↓ : Copy current line below the line in which the cursor is placed
  • Ctrl+Alt+↑ : Copy current line above the line in which the cursor is placed
  • Alt+Up : Move line one line up
  • Alt+Down : Move line one line down

Shortcuts to delete lines

  • Ctrl+D : Deletes line
  • Ctrl+Shift+DEL : Delete until end of line
  • Ctrl+DEL : Delete next element
  • Ctrl+BACKSPACE : Delete previous element

Shortcuts to create new lines

  • Shift+Enter : Adds a blank line below the current line and moves the cursor to the new line. The difference between a regular enter is that the currently line is unchanged, independently of the position of the cursor.
  • Ctrl+Shift+Enter : Same as Shift + Enter but above

Shortcuts to variable assignment

  • Ctrl+2, L : Assign statement to new local variable
  • Ctrl+2, F : Assign statement to new field

Shortcuts to coding

  • Shift+F2 : Show the Java doc for the selected type / class / method
  • Alt+Shift+N : Shortcut for the menu to create new objects
  • Alt+Shift+Z : Surround block with try and catch

Shortcuts to refactoring

  • Alt+Shift+R : Rename
  • Ctrl+2, R : Rename locally (in file), faster than Alt + Shift + R
  • Alt+Shift+T : Opens the context-sensitive refactoring menu, e.g., displays

Shortcuts must known by every developer

The following shortcuts are the absolute minimum a developer should be familiar with to work efficient in Eclipse.

  • Ctrl+S : Saves current editor
  • Ctrl+1 : Quick fix; shows potential fixes for warnings, errors or shows possible actions
  • Ctrl+Space : Content assist/ code completion
  • Ctrl+Q : Goes to the last edited position
  • Ctrl+D : Deletes current line in the editor
  • Ctrl+Shift+O : Adjusts the imports statements in the current Java source file
  • Ctrl+2, L or F : Assign statement to new local variable or field
  • Ctrl+Shift+T : Open Type Dialog
  • Ctrl+F11 : Run last launched application
  • Shift+F10 : Opens context menu. Keyboard equivalent to Mouse2
  • Ctrl+F10 : Opens view menu for current view.

If you are using some more useful Eclipse keyboard shortcuts which are not included then please post as comments, I will include them in this list. Let me know if you face any issues while using these eclipse shortcuts in any particular version of Eclipse IDE.


How to Enable YAML Editor in Eclipse?


Below are steps to Enable YAML/YML editor on eclipse IDE.

  • Open Eclipse IDE
  • Go to Help menu -> Eclipse Marketplace.
  • Search for term “YAML”
  • You will get lots of option select “YAML Editor” and click on install as in below screen.
YAML Editor in Eclipse
Enable YAML/YML Editor on Eclipse
  • Click check box corresponding to “Accept Terms and Conditions”.
  • Click on Apply button and restart eclipse.

More

To know more about YAML Syntax, Configuration with Java and other supporting language, frameworks and tools, Sample configuration files and JSON and YAML conversion follow below YAML Tutorials and YAML related exceptions follow YAML Issues.

Advertisements
Advertisements

Your Feedback Motivate Us

If our FacingIssuesOnIT Experts solutions guide you to resolve your issues and improve your knowledge. Please share your comments, like and subscribe to get notifications for our posts.

Happy Learning !!!

Eclipse : How to set java path of JDK/JRE?


To set path of JDK for your project in eclipse follow below steps:

  • Right click on your project -> select properties.
  • Click in Library tab
  • To remove or update JRE/JDK remove existing from list as below.

See Also: Setup Java/JDK and Eclipse On Window & Linux

Eclipse ClassPath Setting 1
Eclipse : How to set JDK/JRE Path
  • Click on add Library and select option as “JRE System Library” and click on Next button.
Eclipse ClassPath Setting 2
Eclipse : How to set JDK/JRE Path
  • If you need to use existing JRE/JDK you can select from installed JRE or if need to add new one click on Add button.
  • You will get popup of JRE definition. click on Directory option and select JAVA (JRE/JDK) version home directory as in below screen shot
  • Click on Finish button.
Eclipse ClassPath Setting 3
Eclipse : How to set JDK/JRE Path
  • Select one Installed JRE which want to use on your project.
  • Click on “Apply and Close” button.
Eclipse ClassPath Setting 4
Eclipse : How to set JDK/JRE Path
  • Finally selected JRE/JDK added to your project.
  • Click on “Apply and Close” button.
Eclipse ClassPath Setting 5
Eclipse : How to set JDK/JRE Path
Advertisements
Advertisements

Your Feedback Motivate Us

If our FacingIssuesOnIT Experts solutions guide you to resolve your issues and improve your knowledge. Please share your comments, like and subscribe to get notifications for our posts.

Happy Learning !!!