The java.lang.UnsupportedClassVersionError is a sub-class of LinkageError and ClassFormatError. The JVM (Java Virtual Machine) throw this error when try to read a file but Major and Minor Java version are not supported.
This Java Major and Minor class error occurred while running through IDE eclipse/STS or any because you JAVA_HOME or path or IDE Build Path is configured with different version of Java (JDK/JRE) however your code is compiled with different version of IDE. or Maven pom.xml is configured with different java version while running the program over different JDK/JRE which is not match with Major and Minor version supported.
In further post you will get to know about the resolution steps.
Example of Error Messages:
Java
java.lang.LinkageError: XYZ has been compiled by a more recent version of the Java Runtime (class file version 61.0), this version of the Java Runtime only recognizes class file versions up to 55.0
Springboot
java.lang.UnsupportedClassVersionError: XYZ has been compiled by a more recent version of the Java Runtime (class file version 61.0), this version of the Java Runtime only recognizes class file versions up to 55.0
Maven
class file has wrong version 61.0, should be 55.0
Java Major Version
These are the Java Major Versions
Java
Major Version
20
64
19
63
18
62
17
61
16
60
15
59
14
58
13
57
12
56
11
55
10
54
9
53
8
52
7
51
6
50
5
49
1.4
48
1.3
47
1.2
46
1.1
45
1.0.2
45
How to check Java Major Version?
Yu can run the below command in your command prompt.
Follow these steps to resolve Java Major & Minor version issue:
Step 1: Go to command prompt and check for Java version
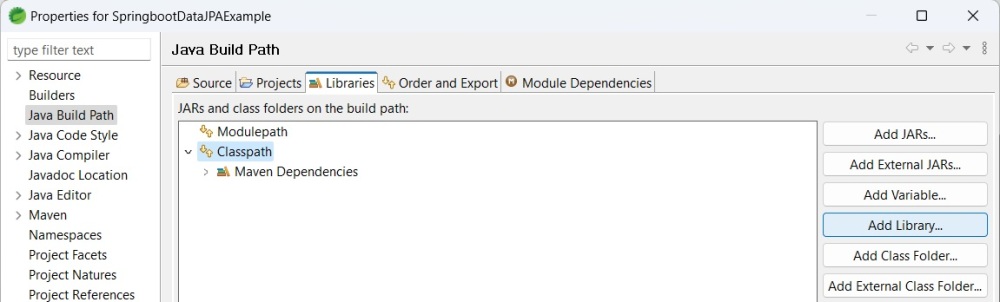
Step 2: In case your system is having more than one version of Java and you want to run your application or code with specific version, then go to Application-> Right click->Select Properties->Go to Build Path->Go to Library and remove the default Library from Class Path and Module Path.
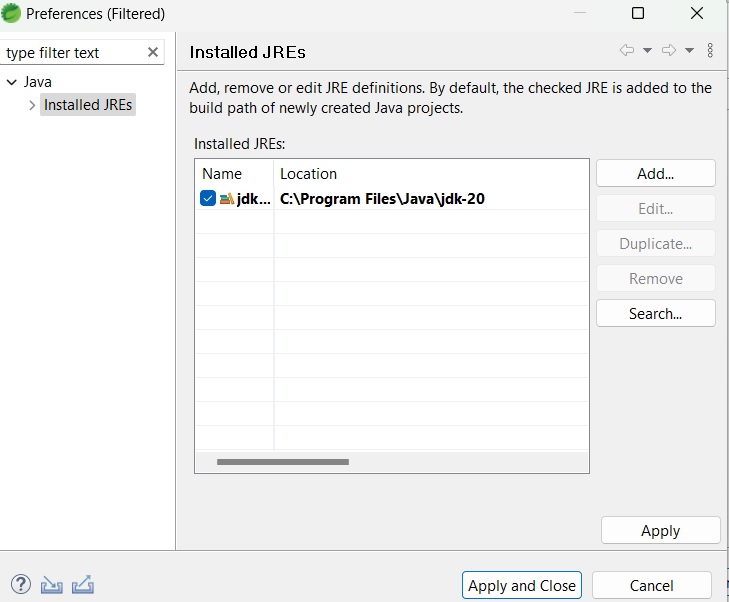
Step 3: Click on Add Library Button and Select JRE System Library, click on Next button. If your JRE on default then select or go to alternate JRE and select Java path as below by Browse button. Click on Apply and Close button and then Finish button
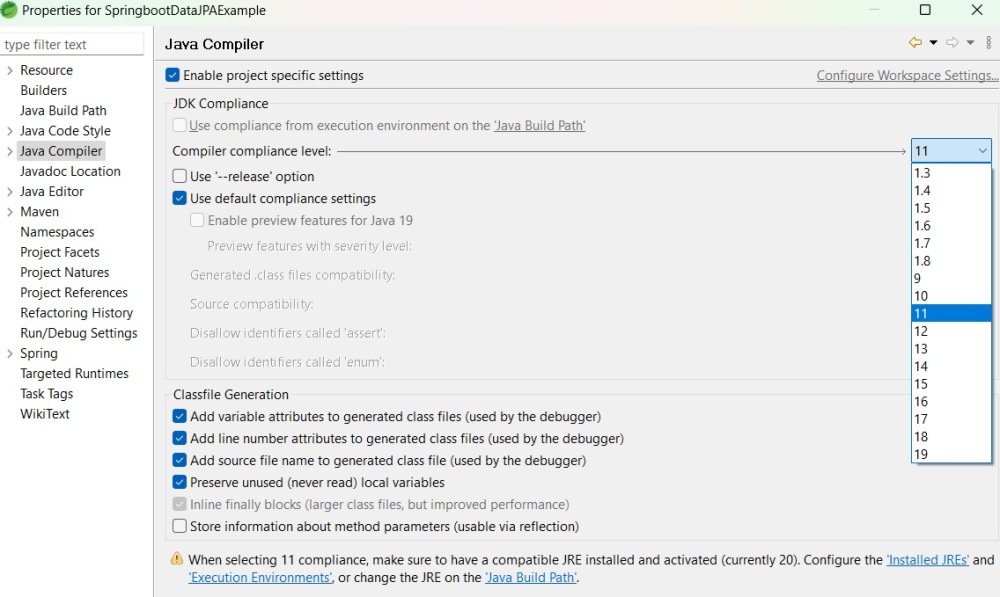
Step 4: Now go to the left panel and select correct compiler version as below and click on apply button.
Step 5: If your application is Maven based then you have to make additional changes in your pom.xml also
In this post you have learned about the Java Major and Minor version and also to check way of checking through command prompt. If you are facing such exceptions also provided way to resolve it.
Advertisements
Advertisements
Your Feedback Motivate Us
If our FacingIssuesOnIT Experts solutions guide you to resolve your issues and improve your knowledge. Please share your comments, like and subscribe to get notifications for our posts.
The java.lang.UnsupportedClassVersionError is a sub-class of LinkageError and ClassFormatError. The JVM (Java Virtual Machine) throw this error when try to read a file but Major and Minor Java version are not supported.
This Java Major and Minor class error occurred while running through IDE eclipse/STS or any because you JAVA_HOME or path or IDE Build Path is configured with different version of Java (JDK/JRE) however your code is compiled with different version of IDE. or Maven pom.xml is configured with different java version while running the program over different JDK/JRE which is not match with Major and Minor version supported.
In further post you will get to know about the resolution steps.
Example of Error Messages:
Java
java.lang.LinkageError: XYZ has been compiled by a more recent version of the Java Runtime (class file version 61.0), this version of the Java Runtime only recognizes class file versions up to 55.0
Springboot
java.lang.UnsupportedClassVersionError: XYZ has been compiled by a more recent version of the Java Runtime (class file version 61.0), this version of the Java Runtime only recognizes class file versions up to 55.0
Maven
class file has wrong version 61.0, should be 55.0
Java Major Version
These are the Java Major Versions
Java
Major Version
20
64
19
63
18
62
17
61
16
60
15
59
14
58
13
57
12
56
11
55
10
54
9
53
8
52
7
51
6
50
5
49
1.4
48
1.3
47
1.2
46
1.1
45
1.0.2
45
How to check Java Major Version?
Yu can run the below command in your command prompt.
Follow these steps to resolve Java Major & Minor version issue:
Step 1: Go to command prompt and check for Java version
Step 2: In case your system is having more than one version of Java and you want to run your application or code with specific version, then go to Application-> Right click->Select Properties->Go to Build Path->Go to Library and remove the default Library from Class Path and Module Path.
Step 3: Click on Add Library Button and Select JRE System Library, click on Next button. If your JRE on default then select or go to alternate JRE and select Java path as below by Browse button. Click on Apply and Close button and then Finish button
Step 4: Now go to the left panel and select correct compiler version as below and click on apply button.
Step 5: If your application is Maven based then you have to make additional changes in your pom.xml also
In this post you have learned about the Java Major and Minor version and also to check way of checking through command prompt. If you are facing such exceptions also provided way to resolve it.
Advertisements
Advertisements
Your Feedback Motivate Us
If our FacingIssuesOnIT Experts solutions guide you to resolve your issues and improve your knowledge. Please share your comments, like and subscribe to get notifications for our posts.
While running through Run As-> Junit executing Junit test cases but when run through Maven test throwing below error.
[INFO] ------------------------------------------------------------------------
[INFO] BUILD FAILURE
[INFO] ------------------------------------------------------------------------
[INFO] Total time:  2.916 s
[INFO] Finished at: 2021-05-08T04:50:23+05:30
[INFO] ------------------------------------------------------------------------
[ERROR] Failed to execute goal org.apache.maven.plugins:maven-surefire-plugin:2.12.4:test (default-test) on project maven-junit-code-coverage-Jacoco: There are test failures.
[ERROR]
[ERROR] Please refer to D:\Workspace\maven-junit-code-coverage-Jacoco\target\surefire-reports for the individual test results.
[ERROR] -> [Help 1]
[ERROR]
[ERROR] To see the full stack trace of the errors, re-run Maven with the -e switch.
[ERROR] Re-run Maven using the -X switch to enable full debug logging.
[ERROR]
[ERROR] For more information about the errors and possible solutions, please read the following articles:
[ERROR] [Help 1] http://cwiki.apache.org/confluence/display/MAVEN/MojoFailureException
Problem
In maven java project, maven-surefire-plugin is required for any types of reports generation because mvn test command execute the test cases but there is not added the plug in for maven-surefire-plugin that’s why maven is not able to execute test cases.
Solution
To execute your test cases with Junit in maven Java project, you can add Junit dependency with maven-surefire-plugin.
While build my maven java project getting below exception.
[ERROR] Failed to execute goal org.apache.maven.plugins:maven-compiler-plugin:3.1:compile (default-compile) on project Sym360: Compilation failure: Compilation failure:
[ERROR] Source option 5 is no longer supported. Use 6 or later.
[ERROR] Target option 1.5 is no longer supported. Use 1.6 or later.
[ERROR] -> [Help 1]
Problem
This issue is because the maven is not able to identify which version of java compiler need to use while build your code.
Solution
There are two solution to handle such problem.
If you are using simple maven java application then you can add these lines in you pom.xml properties tag .
Maven is a software project management and builds tool developed for Java-based applications.
Gradle is an open-source, build automation system built on concepts of maven and ant.
Maven makes build process easier, provides best guidelines for development and allow to migrate new features
Gradle allows structuring of build and supports for multi projects builds. Gradle increases productivity provides ways to migrate and builds applications.
Advertisements
Advertisements
Your Feedback Motivate Us
If our FacingIssuesOnIT Experts solutions guide you to resolve your issues and improve your knowledge. Please share your comments, like and subscribe to get notifications for our posts.
Ant was the first “modern” java application build tool released in 2000. It was famous in a short time because easy to learn, based on procedural programming and not required any additional preparation.
Ant was having some issues in terms of, build time, performance and big scripts and other problems of developers.
Maven releases in 2004 which covers all the problems of Ant and having a complete life cycle.
Here are some main differences between Maven and Ant build tool.
Ant
Maven
Ant required build script per project.
Maven describes the project over configuration.
Ant invoke project-specific targets
Maven invoke defined goals (target)
Ant is for “just” build process
Maven required knowledge of the project.
Ant scripts are too complex.
Maven creates standard project layout and builds in the lifecycle.
Ant scripts are not reusable.
Maven plugins and repository are reusable.
Advertisements
Advertisements
Your Feedback Motivate Us
If our FacingIssuesOnIT Experts solutions guide you to resolve your issues and improve your knowledge. Please share your comments, like and subscribe to get notifications for our posts.
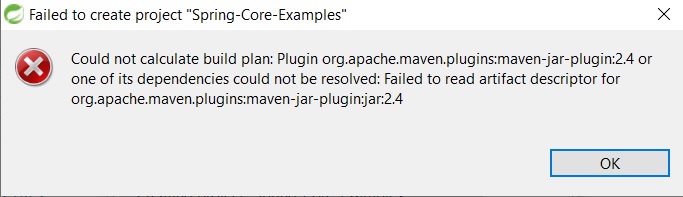
This maven error generally happen when create maven based web project by using “maven-archtype-console” which generally try to import all library automatically.
You will see this complete error message on pom.xml
Could not calculate build plan: Plugin org.apache.maven.plugins:maven-jar-plugin:2.4 or one of its dependencies could not be resolved: Failed to read artifact descriptor for org.apache.maven.plugins:maven-jar-plugin:jar:2.4
POM.XML
  4.0.0
  com.FacingIssuesOnIT
  Spring-Core-Examples
  0.0.1-SNAPSHOT
  Spring-Core-Examples
  Spring Core Exammples
Solution 1:
You need just to follow those steps:
Right Click on your project: Run (As) -> Maven clean
Right Click on your project: Run (As) -> Maven install
After which, if the build fails when you do Maven Install, it means there is no web.xml file under WEB-INF or some problem associated with it.
Solution 2:
Right click on project-> Maven->Click checked box ‘Force Update’->Update
This maven error generally happen when create maven based web project by using “maven-archtype-webapp” which generally try to import all library automatically.
You will see this complete error message on pom.xml
Description Resource Path Location Type Failure to transfer org.apache.maven.plugins:maven-surefire-plugin:pom:2.12.4 from http://repo.maven.apache.org/maven2 was cached in the local repository, resolution will not be reattempted until the update interval of central has elapsed or updates are forced. Original error: Could not transfer artifact org.apache.maven.plugins:maven-surefire-plugin:pom:2.12.4 from/to central (http://repo.maven.apache.org/maven2): The operation was cancelled. pom.xml /SpringCoreTuto line 1 Maven Configuration Problem
You need just to follow those steps:
Step 1: Right Click on your project: Run (As) -> Maven clean
Step 2: Right Click on your project: Run (As) -> Maven install
After which, if the build fails when you do Maven Install, it means there is no web.xml file under WEB-INF or some problem associated with it.
Solution 2:
Right click on project-> Maven->Click checked box ‘Force Update’->Update
Generally this error message shows in pom.xml when create new project with dependencies or add new dependencies in pom.xml.
Reason to cause this error
There are several reason to cause this error as below because maven is unable to connect to Maven repository at http://repo1.maven.org/maven2.
Proxy
Network issue
.lastUpdate file for dependency
Could not transfer artifact org.springframework:spring-expression:jar:5.1.6.RELEASE from/to central (https://repo.maven.apache.org/maven2): C:\Users\saurabh.gupta1\.m2\repository\org
 \springframework\spring-expression\5.1.6.RELEASE\aether-fa07bf3e-4fa1-4911-bcad-3319e4b2480e-spring-expression-5.1.6.RELEASE.jar-in-progress (The system cannot find the file
 specified) org.eclipse.aether.transfer.ArtifactTransferException:
Solutions
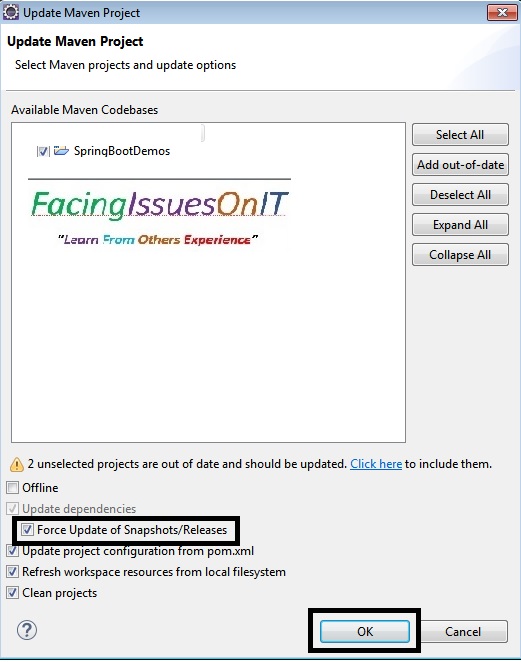
There are few ways i find out to resolve this issue:
Maven Force Update of Snapshot/Releases
Follow below steps to to resolve this issue and clear all dependencies error in eclipse.
Right click on project.
Go to Maven
Update project , the check the above option “Force update of Snapshot/Releases“.
Click on Ok.
If not fixed restart your eclipse.
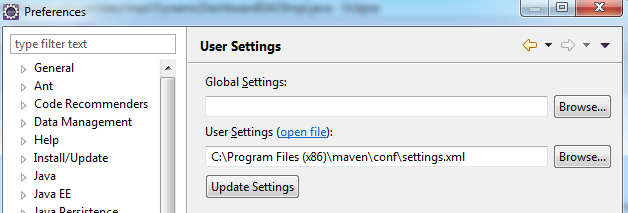
Maven access through Proxy
Update your proxy configuration in maven settings.xml file and put it inside .m2 folder
C:\Users\USER NAME.m2
proxy settings
      myproxy
      true
      http
      user name
      password
      127.56.8.64
      80
      local.net|some.host.com
You don’t need to touch , and sections, unless you really know what are these tags.
After updating this setting restart eclipse and follow the steps in Maven Force update of Snapshot/Releases.
Remove .lastUpdated file
If this problem is not resolved yet got to .m2/repository/ to dependency sub directory and remove .lastUpdate file inside of it or delete complete directory for this particular dependency and again follow the steps in Maven Force update of Snapshot/Releases.
For Example as for above issue directory location showing in exception as
This maven exception occurs when your Window/Unix environment variable for JAVA_HOME and PATH are pointing to JRE instead of JDK. That’s why maven will not compile code and throw below exception.
Problem
[INFO] Scanning for projects...
[INFO]
[INFO] ------------------------------------------------------------------------
[INFO] Building SpringBootApp 0.0.1-SNAPSHOT
[INFO] ------------------------------------------------------------------------
[INFO] Downloading: https://repo.maven.apache.org/maven2/org/apache/maven/plugins/maven-install-plugin/2.5.2/maven-install-plugin-2.5.2.pom
[INFO] Downloaded: https://repo.maven.apache.org/maven2/org/apache/maven/plugins/maven-install-plugin/2.5.2/maven-install-plugin-2.5.2.pom (7 KB at 2.3 KB/sec)
[INFO] Downloading: https://repo.maven.apache.org/maven2/org/apache/maven/plugins/maven-plugins/25/maven-plugins-25.pom
[INFO] Downloaded: https://repo.maven.apache.org/maven2/org/apache/maven/plugins/maven-plugins/25/maven-plugins-25.pom (10 KB at 10.2 KB/sec)
[INFO]
[INFO] --- maven-resources-plugin:3.0.1:resources (default-resources) @ SpringBootApp ---
[INFO] Using 'UTF-8' encoding to copy filtered resources.
[INFO] Copying 0 resource
[INFO] Copying 0 resource
[INFO]
[INFO] --- maven-compiler-plugin:3.7.0:compile (default-compile) @ SpringBootApp ---
[INFO] Changes detected - recompiling the module!
[INFO] Compiling 1 source file to D:\Saurabh Gupta\facingIssuesOnIT\SpringBootApp\target\classes
[INFO] -------------------------------------------------------------
[ERROR] COMPILATION ERROR :
[INFO] -------------------------------------------------------------
[ERROR] No compiler is provided in this environment. Perhaps you are running on a JRE rather than a JDK?
[INFO] 1 error
[INFO] -------------------------------------------------------------
[INFO] ------------------------------------------------------------------------
[INFO] BUILD FAILURE
[INFO] ------------------------------------------------------------------------
[INFO] Total time: 5.342 s
[INFO] Finished at: 2018-05-28T15:59:31+05:30
[INFO] Final Memory: 20M/209M
[INFO] ------------------------------------------------------------------------
[ERROR] Failed to execute goal org.apache.maven.plugins:maven-compiler-plugin:3.7.0:compile (default-compile) on project SpringBootApp: Compilation failure
[ERROR] No compiler is provided in this environment. Perhaps you are running on a JRE rather than a JDK?
[ERROR] -> [Help 1]
[ERROR]
[ERROR] To see the full stack trace of the errors, re-run Maven with the -e switch.
[ERROR] Re-run Maven using the -X switch to enable full debug logging.
[ERROR]
[ERROR] For more information about the errors and possible solutions, please read the following articles:
[ERROR] [Help 1] http://cwiki.apache.org/confluence/display/MAVEN/MojoFailureException
Solutions
To resolve this issue you can follow below steps by solving command prompt or Eclipse.
If our FacingIssuesOnIT Experts solutions guide you to resolve your issues and improve your knowledge. Please share your comments, like and subscribe to get notifications for our posts.
Maven Connect Timeout from/to Central “https://repo.maven.apache.org/maven2” happen when you are in VPN and proxy network where your office firewall not allowing to download from outside network.
CoreException: Could not calculate build plan: Plugin org.apache.maven.plugins:maven-compiler-plugin:3.1 or one of its dependencies could not be resolved: Failed to read artifact descriptor for org.apache.maven.plugins:maven-compiler-plugin:jar:3.1: ArtifactResolutionException: Could not transfer artifact org.apache.maven.plugins:maven-compiler-plugin:pom:3.1 from/to central (https://repo.maven.apache.org/maven2): connect timed out
Solution 1:
Try after exiting from VPN Network so that your office firewall not stop you to download dependencies.
Solution 2:
Update your firewall proxy settings in ./m2/settings.xml or /maven directory/conf/settings.xml file as below
Build Project : Go to project directory and run below command to build your project. It will go through all these steps to complete build life cycle as you can see from console logs.It will create war file for your application.
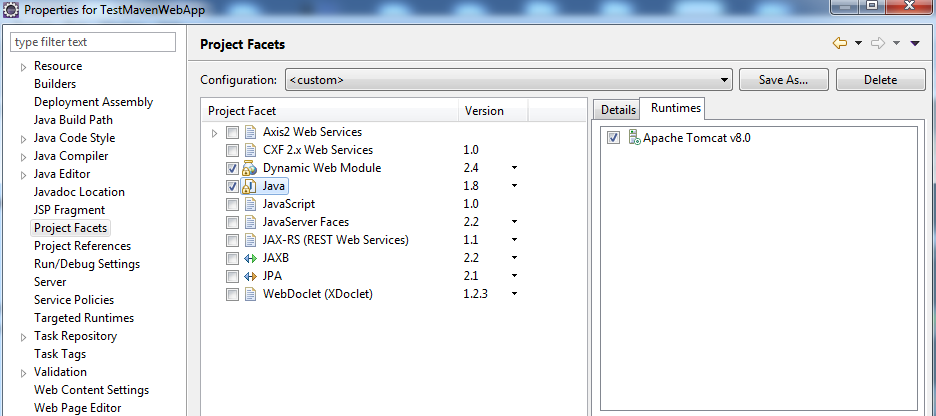
It will show some compile time issue on index.jsp page because not attached with any Web Server and also select Java compiler version from facet as given screen.
TestMavenWebApp Project -> Right Click ->Properties -> Project Facets
Select Runtime and Java compiler version as configured in class path. Click on apply and OK.
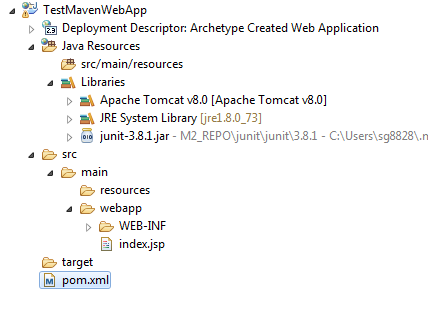
Your Project is ready to more development and configured in eclipse . It will have below directory Structure.
Run Project:
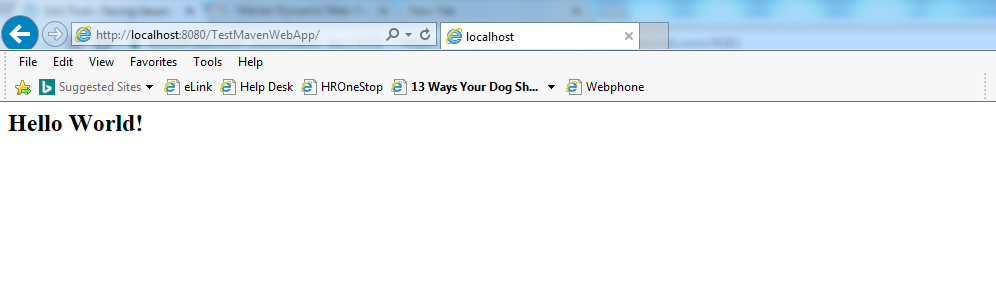
TestMavenWebApp Project ->Run As ->Run On Server
We will get below screen after successful execution.
Leave you feedback to enhance more on this topic so that make it more helpful for others.
Advertisements
Advertisements
Your Feedback Motivate Us
If our FacingIssuesOnIT Experts solutions guide you to resolve your issues and improve your knowledge. Please share your comments, like and subscribe to get notifications for our posts.
In below steps will show about to add 3rd party/custom/external Jars in local repository for use in our project builds because these jars doesn’t exist in Maven public repository and required to build project.
Example : Oracle is 3rd party and it’s jars are available in maven public repository. We can use below command to store in maven local repository and make entry in pom.xml to use it.
If our FacingIssuesOnIT Experts solutions guide you to resolve your issues and improve your knowledge. Please share your comments, like and subscribe to get notifications for our posts.
Build Project : Go to project directory and run below command to build your project. It will go through all these steps to complete build life cycle as you can see from console logs.
If our FacingIssuesOnIT Experts solutions guide you to resolve your issues and improve your knowledge. Please share your comments, like and subscribe to get notifications for our posts.
Unzip file apache-maven-X.X.X-bin.zip and change unzip file name like name as maven. It will have directory structure like below
Maven Directory Structure
Copy this maven folder to C:\Program Files (x86) directory.
Add below Environment Variable by right click on My Computer -> Properties-> Environment Variable/Advance System Settings
User Environment Variable

M2_HOME : C:\Program Files (x86)\maven
M2: %M2_HOME%\bin
PATH : %M2%;

If you already have any value in PATH add %M2%;   after end of value.
It will show as below in screen shot
Close all console instances/Command prompt if running and open new command prompt and run below command and will receive output with version of Maven and Java.
Download latest version of Maven and Untar it with below command
tar -zxvf apache-maven-3.5.0-bin.tar.gz
change name of directory as apache-maven-3.5.0 and set maven environment variable as below for configuration
$ export M2_HOME=/opt/app/facingissuesonit/apache-maven-3.5.0

$ export M2=$M2_HOME/bin
Set below for memory configuration
$ export MAVEN_OPTS=-Xms256m -Xmx512m
with M2_Home path corresponding with the location of your extracted Maven files.

Now append the M2 environment variable to the system path as below:

$ export PATH=$M2:$PATH
To check maven install successfully follow below command


![[Solved] Maven: No compiler is provided in this environment. Perhaps you are running on a JRE rather than a JDK](https://facingissuesonit.com/wp-content/uploads/2017/06/maven.png?w=50&h=50&crop=1)


You must be logged in to post a comment.